Friday, 27 February 2015

Traveling Down Under: GWC at Search Engine Room and Search Summit Australia

G'day Webmasters! Google Webmaster Central is excited to be heading to Sydney for Search Summit and Search Engine Room on March 1-2 and 20-21, respectively.

In addition to our coverage of topics in bot obedience and site architecture, we'll also provide a clinic for building Sitemaps, and chances to "chew the fat" with the Aussies in the "Google Breakfast" and "Google Webmaster Central Q&A." Our Search Evangelist, Adam Lasnik, will lead a fun session in "Living the Non 9-5 Life, Tips for Achieving Balance, Sanity...", where mostly, we hope to learn from you.

Search Summit

Thursday, March 1st
Site Architecture, CSS and Tableless Design 14:45 - 15:30
Peeyush Ranjan, Engineering Manager

Friday, March 2nd
Bot Obedience 09:45 - 10:00
Dan Crow, Product Manager, Crawl Systems

Web 2.0 & Search 11:15 - 12:00
Dan Crow, Product Manager, Crawl Systems

Google Linking Clinic 12:00 - 12:45
Adam Lasnik, Search Evangelist

Lunch with Google Webmaster Central 12:45 -13:30

Sitemap Clinic 13:30 - 14:15
Maile Ohye, Developer Support Engineer

Google Webmaster Central Q&A 14:15 - 15:00

Living the Non 9-5 Life, Tips for Achieving Balance, Sanity... 15:00 - 15:45
Adam Lasnik, Search Evangelist

Search Engine Room

Tuesday, March 20th
Google Breakfast 07:30 - 09:00
Aaron D'Souza, Software Engineer, Search Quality

Don't Be Evil 09:30 - 10:30
Richard Kimber, Managing Director of Sales and Operations

Thursday, 26 February 2015

Better badware notifications for webmasters

In the fight against badware, protecting Google users by showing warnings before they visit dangerous sites is only a small piece of the puzzle. It's even more important to help webmasters protect their own users, and we've been working on this with StopBadware.org. A few months ago we took the first step and integrated malware notifications into webmaster tools. I'm pleased to announce that we are now including more detailed information in these notifications, and are also sending them to webmasters via email.

Webmaster tools notifications
Now instead of simply informing webmasters that their sites have been flagged and suggesting next steps, we're also showing example URLs that we've determined to be dangerous. This can be helpful when the malicious content is hard to find. For example, a common occurrence with compromised sites is the insertion of a 1-pixel iframe causing the automatic download of badware from another site. By providing example URLs, webmasters are one step closer to diagnosing the problem and ultimately re-securing their sites.

Email notifications
In addition to notifying webmaster tools users, we've also begun sending email notifications to some of the webmasters of sites that we flag for badware. We don't have a perfect process for determining a webmaster's email address, so for now we're sending the notifications to likely webmaster aliases for the domain in question (e.g., webmaster@, admin@, etc). We considered using whois records, but these often contain contact information for the hosting provider or registrar, and you can guess what might happen if a web host learned that one of its client sites was distributing badware. We're planning to allow webmasters to provide a preferred email address for notifications through webmaster tools, so look for this change in the future.

Update: For more information, please see our Help Center article on malware and hacked sites.

Wednesday, 25 February 2015

Complete guide to ClockworkMod Recovery

ClockworkMod – also known as Clockwork and CWM – is a custom recovery for Android phones and tablets that allows you to perform several advanced recovery, restoration, installation and maintenance operations on your Android device that are not possible with the stock recovery. This guide will cover all that this recovery is capable of doing, and how to do it.

Here is what shall be covered in this guide:
  • About Android recovery
  • Introduction to ClockworkMod
  • Installing ClockworkMod
  • Booting into ClockworkMod
  • Feature tour

Now let's take a look at each of these topics in detail.


About Android Recovery

All Android devices are shipped with a recovery console that is basically a partition on the device's internal memory and can be booted into. The stock recovery of almost all Android devices provides a few basic yet handy options that allow you to factory reset your device and also to recover its operating system using an official ROM in zip format, but that is all you can do with it. That's where a custom recovery comes handy...

A custom Android recovery basically replaces the stock recovery with one that lets you do all you can do with the stock recovery, plus a plethora of more options to give you a lot more control on your device. With a custom recovery, you can install official and unofficial ROMs as well as other updates including apps, themes, kernels etc. using zip files, wipe not just user data but pretty much every partition on your device, mount the storage card for USB mass storage access without leaving recovery, partition your SD card, wipe Dalvik cache and battery stats, fix permissions, perform, manage and restore backups and so on.


Introduction To ClockworkMod

ClockworkMod recovery is one of the most widely used custom Android recoveries that is available for most mainstream Android devices. This recovery has been developed by Koushik Dutta (also known as Koush) – the creator of Android ROM Manager.


Installing ClockworkMod

What sets ClockworkMod recovery apart from most other custom Android recoveries is its dead simple installation process on most devices. It does require you to fully root your device in order to be installed but once rooted, installing it is as simple as installing ROM Manager and choosing the proper option.

However, in certain cases, this ROM Manager method will not work. That is the case for MediaTek chipset based devices and here is a warning for any owner of such a device: don't use ROM Manager or else you'll get a brick!!!

For those, the method you should follow in order to install ClockworkMod recovery is described on both my MT65x3 and MT6516 flashing tutorials:


Please note that those are just generic flashing tutorials. You need to find the ClockworkMod recovery image specifically designed for your device.


Booting Into ClockworkMod

Once you have ClockworkMod recovery installed on your Android device, booting into it is quite simple:

  • Using hardware button combination on most Android devices:
On most Android devices including ones by HTC, you can enter recovery by powering your device off and then powering it back on while keeping either the ‘Volume-Down’ or the ‘Volume-Up’ button pressed, depending on the device. This will enter the bootloader from where you can select the ‘RECOVERY’ option by navigating to it with the Volume key and entering it with the ‘Power’ key.
On MediaTek chipset based devices, such as G11i Pro, the method is the same as above, except that in this case the device will to boot directly into recovery mode. In very rare cases, the device needs to be connected to the computer via the normal USB data cable.
On most Samsung devices, specifically Samsung Galaxy S series devices, you must keep both the ‘Volume-Up’ and ‘Home’ keys pressed while powering on the device, to directly enter recovery. 

  • Using ADB (for advanced users):
If you have ADB installed on your computer, you can simply enable USB debugging mode on your device from Settings > Applications > Development, connect it to your computer via USB, launch a Command Prompt / Terminal window on your computer and enter this command: 
adb reboot recovery

  • Using extended power menu on your Android device:
This is another way of booting into recovery, but please note that the extended power menu is only present on some custom ROMs.


Feature Tour

Let's now take a look at all the options CWM recovery offers you to manage your Android device. In this example, the phone used was my G11i Pro running ClockworkMod recovery 5.0.2.8 but the details should apply to other devices and other 3+ versions of the recovery as well.

This is what you see when you reboot your device into ClockworkMod recovery:


You can navigate these options by using the ‘Volume-Up’ and ‘Volume-Down’ keys to highlight an option and the ‘Power’ key to enter / launch the highlighted option on most Android devices. On devices equipped with a trackball or an optical track pad such as G1, G2, Nexus One, HTC Desire etc., the trackball or track pad can be used for navigation and clicking it can be used to enter / launch the selected option. Let's review each of these options and their sub-menu options in detail.

    1 - reboot system now
    This one is self-explanatory.

    2 - apply update from sdcard
    This can be used for installation of any official or unofficial update, ROM, kernel, theme etc. that is in a zip format installable from recovery, as long as the file is named update.zip and it has been placed on the root of your SD card (i.e. not in any sub-folder). Selecting this option (and most of the options featured below) will bring up the following confirmation prompt (which you may find annoying but can avoid problems caused by accidental key presses):


    3 - wipe data/factory reset
    This option wipes all user data on the device as well as cache. Doing this will leave your phone in the state it was in when you bought it or when any custom ROM was first installed. It will also wipe any sd-ext partition that you might have setup (more on this later).

    4 - wipe cache partition
    Wipes the cache partition of the device to clear all the data accumulated there over use. This is often used before installing a new ROM, app, kernel or any similar mod via recovery.

    5 - install zip from sdcard
    This option brings up the following sub-menu:


    5.1 - apply /sdcard/update.zip
    This one is essentially the same as the apply update from sdcard option of the main menu.
    5.2 - choose zip from sdcard
    Lets you install any zip file (with any name) from any location on your SD card. The file can be for a ROM, a kernel, an application, a theme or any mod as long as it is in recovery-flashable zip format. This is the most widely used option for installing a ROM that you have downloaded and copied to your SD card. Entering this option will bring up a screen that will allow you to browse your SD card for the zip file and select it for installation as in this screenshot:


    5.3 - toggle signature verification
    Turns the signature verification on and off. When signature verification is on, you will not be able to install any custom ROMs that haven't been signed by the developers (most custom ROMs aren't signed). Switching it off skips the signature verification check and proceeds with the installation.
    5.4 - toggle script asserts
    Seldom-used option for a vast majority of users. It simply turns script asserts on or off. If you don't know about these, it's best not to change this option.
    5.5 - +++++Go Back+++++
    Takes you back to the main recovery menu, obviously!

    6 - backup and restore
    This is without any doubt one of the most important features provided by a custom recovery, the backup and restore feature – also known as Nandroid backup – allows you to take a snapshot of your phone's entire internal memory including all partitions, and save it on the SD card. Here is how it looks:


    6.1 - Backup
    Takes a Nandroid backup, as explained above.
    6.2 - Restore
    Lets you restore a previously taken backup. Entering this option presents you with a list of existing backups from the SD card that you can choose from for restoration.
    6.3 - Advanced Restore
    This option is similar to the Restore option but once a backup has been selected to be restored, this option allows you to choose what parts of it to restore. You can choose to restore the boot, system, data, cache and sd-ext partitions, as shown here:


    7 - mounts and storage
    Allows you to perform maintenance tasks on all the internal and external partitions of your android device:


    7.1 - mount/unmount /system, /data, /cache, /sdcard or /sd-ext
    These options let you toggle between mounting or unmounting these respective partitions. Most users don't need to change these options.
    7.2 - format boot, system, data, cache, sdcard or sd-ext
    These let you directly format any of these partitions. Take extreme care with this option as formatting any of these partitions will result in losing all data on them, especially the boot and system partitions. Formatting the system partition will remove your ROM and leave your phone without an operating system while wiping the boot partition may brick your phone unless you restore or flash another one before rebooting your device. To learn more about the contents of all these partitions, see our guide to Android partitions.
    7.3 - mount USB storage
    Lets you enable USB mass storage mode for your SD card right from recovery so that you can connect it to your computer via USB and transfer any files to/from it without having to leave recovery.

    8 - advanced
    This section contains a few options most users will not require, though these can come handy quite often, especially wiping Dalvik cache, which is required before most ROM installations. Here are the options from this section:


    8.1 - Reboot Recovery
    Lets you directly and very conveniently reboot from recovery right back into recovery. This is useful option for certain back-to-back installations that require the device to at least boot once between them.
    8.2 - Wipe Dalvik Cache
    Allows you to wipe the cache for the Dalvik virtual machine (the custom-built Java virtual machine for Android).This is required before most ROM installations and at other occasions too, for fixing some problems.
    8.3 - Wipe Battery Stats
    Wipes the saved battery usage statistics and effectively recalibrates the battery. Useful in various scenarios when Android is not showing correct battery levels.
    8.4 - Report Error
    In case of errors, this feature can be used to save a log of recent ClockworkMod recovery operations on the SD card that you can later report from Android using ROM Manager.
    8.5 - Key Test
    Lets you press any of the hardware keys to see if they are properly functioning, and to see their key codes.
    8.6 - Partition SD Card
    This option gives you a no-frills way to partition your SD card properly for use with ROMs that support data2ext (a very handy hack for low internal memory devices that enables an /sd-ext partition on the SD card to be used as the internal user data storage i.e. as the /data partition). Once this option is selected, you will be given options to choose the sizes for the /sd-ext partition as well as an optional /swap partition on the SD card, and will then automatically format it for you, leaving the remaining space for normal SD card usage. This option will wipe all data from your SD card so use it with caution!


    8.7 - Fix Permissions
    Fixes the file permissions for the internal memory partitions back to default. This is very useful as a fix for several errors and Force-Closes that start appearing after you or an application you installed and provided root access end up messing up the permissions of important files.

    9 - power off
    Do I need to tell you what it does? 

Well... that's all you need to know about ClockworkMod recovery.

Sunday, 22 February 2015

A reminder about selling links that pass PageRank

Webmaster level: all

Google has said for years that selling links that pass PageRank violates our quality guidelines. We continue to reiterate that guidance periodically to help remind site owners and webmasters of that policy.

Please be wary if someone approaches you and wants to pay you for links or "advertorial" pages on your site that pass PageRank. Selling links (or entire advertorial pages with embedded links) that pass PageRank violates our quality guidelines, and Google does take action on such violations. The consequences for a linkselling site start with losing trust in Google's search results, as well as reduction of the site's visible PageRank in the Google Toolbar. The consequences can also include lower rankings for that site in Google's search results.

If you receive a warning for selling links that pass PageRank in Google's Webmaster Tools, you'll see a notification message to look for "possibly artificial or unnatural links on your site pointing to other sites that could be intended to manipulate PageRank." That's an indication that your site has lost trust in Google's index.

To address the issue, make sure that any paid links on your site don't pass PageRank. You can remove any paid links or advertorial pages, or make sure that any paid hyperlinks have the rel="nofollow" attribute. After ensuring that no paid links on your site pass PageRank, you can submit a reconsideration request and if you had a manual webspam action on your site, someone at Google will review the request. After the request has been reviewed, you'll get a notification back about whether the reconsideration request was granted or not.

We do take this issue very seriously, so we recommend you avoid selling (and buying) links that pass PageRank in order to prevent loss of trust, lower PageRank in the Google Toolbar, lower rankings, or in an extreme case, removal from Google's search results.

Saturday, 21 February 2015

Using schema.org markup for videos

Webmaster level: All

Videos are one of the most common types of results on Google and we want to make sure that your videos get indexed. Today, we're also launching video support for schema.org. Schema.org is a joint effort between Google, Microsoft, Yahoo! and Yandex and is now the recommended way to describe videos on the web. The markup is very simple and can be easily added to most websites.

Adding schema.org video markup is just like adding any other schema.org data. Simply define an itemscope, an itemtype=”http://schema.org/VideoObject”, and make sure to set the name, description, and thumbnailUrl properties. You’ll also need either the embedURL — the location of the video player — or the contentURL — the location of the video file. A typical video player with markup might look like this:

<div itemscope itemtype="http://schema.org/VideoObject">
  <h2>Video: <span itemprop="name">Title</span></h2>
  <meta itemprop="duration" content="T1M33S" />
  <meta itemprop="thumbnailUrl" content="thumbnail.jpg" />
  <meta itemprop="embedURL"
    content="http://www.example.com/videoplayer.swf?video=123" />
  <object ...>
    <embed type="application/x-shockwave-flash" ...>
  </object>
  <span itemprop="description">Video description</span>
</div>


Using schema.org markup will not affect any Video Sitemaps or mRSS feeds you're already using. In fact, we still recommend that you also use a Video Sitemap because it alerts us of any new or updated videos faster and provides advanced functionality such as country and platform restrictions.

Since this means that there are now a number of ways to tell Google about your videos, choosing the right format can seem difficult. In order to make the video indexing process as easy as possible, we’ve put together a series of videos and articles about video indexing in our new Webmasters EDU microsite.

For more information, you can go through the Webmasters EDU video articles, read the full schema.org VideoObject specification, or ask questions in the Webmaster Help Forum. We look forward to seeing more of your video content in Google Search.

Friday, 20 February 2015

Tips on using feeds and information on subscriber counts in Reader

Does your site have a feed? A feed can connect you to your readers and keep them returning to your content. Most blogs have feeds, but increasingly, other types of sites with frequently changing content are making feeds available as well. Some examples of sites that offer feeds:
Find out how many readers are subscribed to your feed
If your site has a feed, you can now get information about the number of Google Reader and Google Personalized Homepage subscribers. If you use Feedburner, you'll start to see numbers from these subscriptions taken into account. You can also find this number in the crawling data in your logs. We crawl feeds with the user-agent Feedfetcher-Google, so simply look for this user-agent in your logs to find the subscriber number. If multiple URLs point to the same feed, we may crawl each separately, so in this case, just count up the subscriber numbers listed for each unique feed-id. An example of what you might see in your logs is below:

User-Agent: Feedfetcher-Google; (+http://www.google.com/feedfetcher.html; 4 subscribers; feed-id=1794595805790851116)

Making your feed available to Google
You can submit your feed as a Sitemap in webmaster tools. This will let us know about the URLs listed in the feed so we can crawl and index them for web search. In addition, if you want to make sure your feed shows up in the list of available feeds for Google products, simply add a <link> tag with the feed URL to the <head> section of your page. For instance:

<link rel="alternate" type="application/atom+xml" title="Your Feed Title" href="http://www.example.com/atom.xml" />

Remember that Feedfetcher-Google retrieves feeds only for use in Google Reader and Personalized Homepage. For the content to appear in web search results, Googlebot will have to crawl it as well.

Don't yet have a feed?

If you use a content management system or blogging platform, feed functionality may be built right now. For instance, if you use Blogger, you can go to Settings > Site Feed and make sure that Publish Site Feed is set to Yes. You can also set the feed to either full or short and can add a footer. The URL listed here is what subscribers add to their feed readers. A link to this URL will appear on your blog.

More tips from the Google Reader team
In order to provide the best experience for your users, the Google Reader team has also put together some tips for feed publishers. This document covers feed best practices, common implementation pitfalls, and various ways to promote your feeds. Whether you're creating your feeds from scratch or have been publishing them for a long time, we encourage you to take a look at our tips to make the most of your feeds. If you have any questions, please get in touch.

Make the most of Search Queries in Webmaster Tools

Level: Beginner to Intermediate

If you’re intrigued by the Search Queries feature in Webmaster Tools but aren’t sure how to make it actionable, we have a video that we hope will help!


Maile shares her approach to Search Queries in Webmaster Tools

This video explains the vocabulary of Search Queries, such as:
  • Impressions
  • Average position (only the top-ranking URL for the user’s query is factored in our calculation)
  • Click
  • CTR
The video also reviews an approach to investigating Top queries and Top pages:
  1. Prepare by understanding your website’s goals and your target audience (then using Search Queries “filters” to support your knowledge)
  2. Sort by clicks in Top queries to understand the top queries bringing searchers to your site (for the given time period)
  3. Sort by CTR to notice any missed opportunities
  4. Categorize queries into logical buckets that simplify tracking your progress and staying in touch with users’ needs
  5. Sort Top pages by clicks to find the URLs on your site most visited by searchers (for the given time period)
  6. Sort Top pages by impressions to find valuable pages that can be used to help feature your related, high-quality, but lower-ranking pages
After you’ve watched the video and applied the knowledge of your site with the findings from Search Queries, you’ll likely have several improvement ideas to help searchers find your site. If you’re up for it, let us know in the comments what Search Queries information you find useful (and why!), and of course, as always, feel free to share any tips or feedback.

Wednesday, 18 February 2015

MT6575 launch officially announced

MediaTek has officially announced the launch of the new MT6575 platform for Android smartphones. According to the company, it is ideal for entry and mid-range Android smartphones. MT6575 comes with a single core ARM Cortex™-A9 processor clocked at 1 GHz and supports the latest Android version “Ice Cream Sandwich”.

MT6575 also supports 720p playback, 8MP camera, qHD resolution (960x540) and 3D displays, thanks to the PowerVR™ SGX Series 5 GPU. It has world’s lowest power consumption as well as hot swap dual-SIM capability, making it perfect for budget dual-SIM Android devices for developing markets. According to MediaTek, the MT6575 outperformed Qualcomm’s Snapdragon MSM7227A (which is its market equivalent) chipset in a series of third-party benchmarks.

The first smartphones powered by MediaTek MT6575 are expected to be out in the market in Q1 2015.

Saturday, 14 February 2015

Our Valentine's day gift: out of beta and adding comments

Here at webmaster central, we love the webmaster community -- and today, Valentine's Day, we want to show you that our commitment to you is stronger than ever. We're taking webmaster tools out of beta and enabling comments on this blog.

Bye, bye beta
We've come a long way since our initial launch of the Sitemaps protocol in June 2005. Since then, we've expanded to a full set of webmaster tools, changed our name, listened to your input, and expanded even more. 2006 was a year of great progress, and we're just getting started. Coming out of beta means that we're committed to partnering with webmasters around the world to provide all the tools and information you need about your sites in our index. Together, we can provide the most relevant and useful search results. And more than a million of you, speaking at least 18 different languages, have joined in that partnership.

In addition to the many new features that we've provided, we've been making lots of improvements behind the scenes to ensure that webmaster tools are reliable, scalable, and secure.

The Sitemaps protocol has evolved into version 0.9, and Microsoft and Yahoo have joined us in that support to provide standards that make it easier for you to communicate with search engines. We're excited about how much information we've been able to learn about your sites and we plan to continue to develop the best ways for you to provide us with information about individual pages on your sites.

Hello, comments
Our goal is improved communication with webmasters, and while our blog, discussion forum, and tools help us reach that goal, you can now post comments and feedback directly on this blog as well. This helps you talk to us about topics we're posting. We want to do all we can to encourage an open dialogue between Google and the webmaster community; this is another avenue to do that.

As always, if you have questions or want to talk about things other than a particular blog post, head over to our discussion forum. You'll find our team there often, answering questions and gathering feedback. And if you haven't already, check out the "links to this post" link under every post to see other discussions of this blog across the web.

Thank you, webmasters, for joining us in this great collaboration. Happy Valentine's Day.

Friday, 13 February 2015

Update on Public Service Search

Public Service Search is a service that enables non-profit, university, and government web sites to provide search functionality to their visitors without serving ads. While we've stopped accepting new Public Service Search accounts, if you want to add the functionality of this service to your site, we encourage you to check out the Google Custom Search Engine. Note that if you already have a Public Service Search account, you'll be able to continue offering search results on your site.

A Custom Search Engine can provide you with free web search and site search with the option to specify and prioritize the sites that are included in your search results. You can also customize your search engine to match the look and feel of your site, and if your site is a non-profit, university, or government site, you can choose not to display ads on your results pages.

You have two opportunities to disable ads on your Custom Search Engine. You can select the "Do not show ads" option when you first create a Custom Search Engine, or you can follow the steps below to disable advertising on your existing Custom Search Engine:

1. Click the "My search engines" link on the left-hand side of the Overview page.
2. Click the "control panel" link next to the name of your search engine.
3. Under the "Preferences" section of the Control panel page, select the Advertising status option that reads "Do not show ads on results pages (for non-profits, universities, and government agencies only)."
4. Click the "Save Changes" button.

Remember that disabling ads is available only for non-profit, university, and government sites. If you have a site that doesn't fit into one of these categories, you can still provide search to your visitors using the Custom Search Engine capabilities.

For more information or help with Custom Search Engines, check out the FAQ or post a question to the discussion group.

Thursday, 12 February 2015

Come see us at SES London and hear tips on successful site architecture

If you're planning to be at Search Engine Strategies London February 13-15, stop by and say hi to one of the many Googlers who will be there. I'll be speaking on Wednesday at the Successful Site Architecture panel and thought I'd offer up some tips for building crawlable sites for those who can't attend.

Make sure visitors and search engines can access the content
  • Check the Crawl errors section of webmaster tools for any pages Googlebot couldn't access due to server or other errors. If Googlebot can't access the pages, they won't be indexed and visitors likely can't access them either.
  • Make sure your robots.txt file doesn't accidentally block search engines from content you want indexed. You can see a list of the files Googlebot was blocked from crawling in webmaster tools. You can also use our robots.txt analysis tool to make sure you're blocking and allowing the files you intend.
  • Check the Googlebot activity reports to see how long it takes to download a page of your site to make sure you don't have any network slowness issues.
  • If pages of your site require a login and you want the content from those pages indexed, ensure you include a substantial amount of indexable content on pages that aren't behind the login. For instance, you can put several content-rich paragraphs of an article outside the login area, with a login link that leads to the rest of the article.
  • How accessible is your site? How does it look in mobile browsers and screen readers? It's well worth testing your site under these conditions and ensuring that visitors can access the content of the site using any of these mechanisms.

Make sure your content is viewable

  • Check out your site in a text-only browser or view it in a browser with images and Javascript turned off. Can you still see all of the text and navigation?
  • Ensure the important text and navigation in your site is in HTML, not in images, and make sure all images have ALT text that describe them.
  • If you use Flash, use it only when needed. Particularly, don't put all of the text from your site in Flash. An ideal Flash-based site has pages with HTML text and Flash accents. If you use Flash for your home page, make sure that the navigation into the site is in HTML.

Be descriptive

  • Make sure each page has a unique title tag and meta description tag that aptly describe the page.
  • Make sure the important elements of your pages (for instance, your company name and the main topic of the page) are in HTML text.
  • Make sure the words that searchers will use to look for you are on the page.

Keep the site crawlable


  • If possible, avoid frames. Frame-based sites don't allow for unique URLs for each page, which makes indexing each page separately problematic.
  • Ensure the server returns a 404 status code for pages that aren't found. Some servers are configured to return a 200 status code, particularly with custom error messages and this can result in search engines spending time crawling and indexing non-existent pages rather than the valid pages of the site.
  • Avoid infinite crawls. For instance, if your site has an infinite calendar, add a nofollow attribute to links to dynamically-created future calendar pages. Each search engine may interpret the nofollow attribute differently, so check with the help documentation for each. Alternatively, you could use the nofollow meta tag to ensure that search engine spiders don't crawl any outgoing links on a page, or use robots.txt to prevent search engines from crawling URLs that can lead to infinite loops.
  • If your site uses session IDs or cookies, ensure those are not required for crawling.
  • If your site is dynamic, avoid using excessive parameters and use friendly URLs when you can. Some content management systems enable you to rewrite URLs to friendly versions.
See our tips for creating a Google-friendly site and webmaster guidelines for more information on designing your site for maximum crawlability and usability.

If you will be at SES London, I'd love for you to come by and hear more. And check out the other Googlers' sessions too:

Tuesday, February 13th

Auditing Paid Listings & Clickfraud Issues 10:45 - 12:00
Shuman Ghosemajumder, Business Product Manager for Trust & Safety

Wednesday, February 14th

A Keynote Conversation 9:00 - 9:45
Matt Cutts, Software Engineer

Successful Site Architecture 10:30 - 11:45
Vanessa Fox, Product Manager, Webmaster Central

Google University 12:45 - 1:45

Converting Visitors into Buyers 2:45 - 4:00
Brian Clifton, Head of Web Analytics, Google Europe

Search Advertising Forum 4:30 - 5:45
David Thacker, Senior Product Manager

Thursday, February 15th

Meet the Crawlers 9:00 - 10:15
Dan Crow, Product Manager

Web Analytics and Measuring Successful Overview 1:15 - 2:30
Brian Clifton, Head of Web Analytics, Google Europe

Search Advertising Clinic 1:15 - 2:30
Will Ashton, Retail Account Strategist

Site Clinic 3:00 - 4:15
Sandeepan Banerjee, Sr. Product Manager, Indexing

      Monday, 9 February 2015

      Preparing your site for a traffic spike

      Webmaster level: Intermediate

      It’s a moment any site owner both looks forward to, and dreads: a huge surge in traffic to your site (yay!) can often cause your site to crash (boo!). Maybe you’ll create a piece of viral content, or get Slashdotted, or maybe Larry Page will get a tattoo and your site on tech tattoos will be suddenly in vogue.

      Many people go online immediately after a noteworthy event—a political debate, the death of a celebrity, or a natural disaster—to get news and information about that event. This can cause a rapid increase in traffic to websites that provide relevant information, and may even cause sites to crash at the moment they’re becoming most popular. While it’s not always possible to anticipate such events, you can prepare your site in a variety of ways so that you’ll be ready to handle a sudden surge in traffic if one should occur:
      • Prepare a lightweight version of your site.
        Consider maintaining a lightweight version of your website; you can then switch all of your traffic over to this lightweight version if you start to experience a spike in traffic. One good way to do this is to have a mobile version of your site, and to make the mobile site available to desktop/PC users during periods of high traffic. Another low-effort option is to just maintain a lightweight version of your homepage, since the homepage is often the most-requested page of a site as visitors start there and then navigate out to the specific area of the site that they’re interested in. If a particular article or picture on your site has gone viral, you could similarly create a lightweight version of just that page.
        A couple tips for creating lightweight pages:
        • Exclude decorative elements like images or Flash wherever possible; use text instead of images in the site navigation and chrome, and put most of the content in HTML.
        • Use static HTML pages rather than dynamic ones; the latter place more load on your servers. You can also cache the static output of dynamic pages to reduce server load.
      • Take advantage of stable third-party services.
        Another alternative is to host a copy of your site on a third-party service that you know will be able to withstand a heavy stream of traffic. For example, you could create a copy of your site—or a pared-down version with a focus on information relevant to the spike—on a platform like Google Sites or Blogger; use services like Google Docs to host documents or forms; or use a content delivery network (CDN).
      • Use lightweight file formats.
        If you offer downloadable information, try to make the downloaded files as small as possible by using lightweight file formats. For example, offering the same data as a plain text file rather than a PDF can allow users to download the exact same content at a fraction of the filesize (thereby lightening the load on your servers). Also keep in mind that, if it’s not possible to use plain text files, PDFs generated from textual content are more lightweight than PDFs with images in them. Text-based PDFs are also easier for Google to understand and index fully.
      • Make tabular data available in CSV and XML formats.
        If you offer numerical or tabular data (data displayed in tables), we recommend also providing it in CSV and/or XML format. These filetypes are relatively lightweight and make it easy for external developers to use your data in external applications or services in cases where you want the data to reach as many people as possible, such as in the wake of a natural disaster.
      We’d love to hear your tips and tricks for weathering traffic spikes—come join us in our Webmaster Help Forum.

      Thursday, 5 February 2015

      Discover your links

      Update on October 15, 2008: For more recent news on links, visit Links Week on our Webmaster Central Blog. We're discussing internal links, outbound links, and inbound links.

      You asked, and we listened: We've extended our support for querying links to your site to much beyond the link: operator you might have used in the past. Now you can use webmaster tools to view a much larger sample of links to pages on your site that we found on the web. Unlike the link: operator, this data is much more comprehensive and can be classified, filtered, and downloaded. All you need to do is verify site ownership to see this information.


      To make this data even more useful, we have divided the world of links into two types: external and internal. Let's understand what kind of links fall into which bucket.


      What are external links?
      External links to your site are the links that reside on pages that do not belong to your domain. For example, if you are viewing links for http://www.google.com/, all the links that do not originate from pages on any subdomain of google.com would appear as external links to your site.

      What are internal links?

      Internal links to your site are the links that reside on pages that belong to your domain. For example, if you are viewing links for http://www.google.com/, all the links that originate from pages on any subdomain of google.com, such as http://www.google.com/ or mobile.google.com, would appear as internal links to your site.

      Viewing links to a page on your site

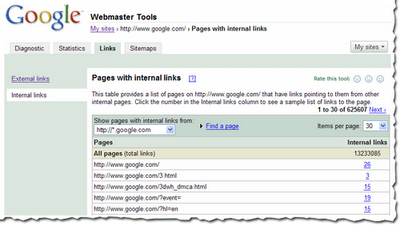
      You can view the links to your site by selecting a verified site in your webmaster tools account and clicking on the new Links tab at the top. Once there, you will see the two options on the left: external links and internal links, with the external links view selected. You will also see a table that lists pages on your site, as shown below. The first column of the table lists pages of your site with links to them, and the second column shows the number of the external links to that page that we have available to show you. (Note that this may not be 100% of the external links to this page.)


      This table also provides the total number of external links to your site that we have available to show you.
      When in this summary view, click the linked number and go to the detailed list of links to that page.
      When in the detailed view, you'll see the list of all the pages that link to specific page on your site, and the time we last crawled that link. Since you are on the External Links tab on the left, this list is the external pages that point to the page.


      Finding links to a specific page on your site
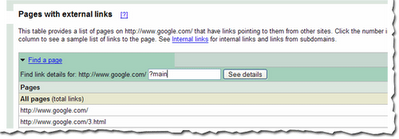
      To find links to a specific page on your site, you first need to find that specific page in the summary view. You can do this by navigating through the table, or if you want to find that page quickly, you can use the handy Find a page link at the top of the table. Just fill in the URL and click See details. For example, if the page you are looking for has the URL http://www.google.com/?main, you can enter “?main” in the Find a page form. This will take you directly to the detailed view of the links to http://www.google.com/?main.


      Viewing internal links

      To view internal links to pages on your site, click on the Internal Links tab on the left side bar in the view. This takes you to a summary table that, just like external links view, displays information about pages on your site with internal links to them.

      However, this view also provides you with a way to filter the data further: to see links from any of the subdomain on the domain, or links from just the specific subdomain you are currently viewing. For example, if you are currently viewing the internal links to http://www.google.com/, you can either see links from all the subdomains, such as links from http://mobile.google.com/ and http://www.google.com, or you can see links only from other pages on http://www.google.com.


      Downloading links data
      There are three different ways to download links data about your site. The first: download the current view of the table you see, which lets you navigate to any summary or details table, and download the data in the current view. Second, and probably the most useful data, is the list all external links to your site. This allows you to download a list of all the links that point to your site, along with the information about the page they point to and the last time we crawled that link. Thirdly, we provide a similar download for all internal links to your site.


      We do limit the amount of data you can download for each type of link (for instance, you can currently download up to one million external links). Google knows about more links than the total we show, but the overall fraction of links we show is much, much larger than the link: command currently offers. Why not visit us at Webmaster Central and explore the links for your site?

      Monday, 2 February 2015

      How did you do on the Webmaster Quiz?

      Webmaster Level: All

      Thanks to all of you who took our webmaster quiz and waited patiently to see how well you did! Today, we're pleased to present the Webmaster Quiz answers! We hope this quiz has provided some clarity on common issues users ask about in the Webmaster Help Forum. We'll go over a few of the questions and answers here, but if some of the answers lead you to ask more questions, we encourage you to continue the discussion in the forum!

      1) You have moved your site to a new domain name. For users and search engines, the preferred way to permanently redirect traffic is:

      Correct answer: a) 301 redirect

      Explanation: A 301 redirect is preferred because it tells search engines, "Ok, this is the new domain I want you to show to users from now on," as opposed to something like a 302 redirect, which tells search engines, "Hey, this is only a temporary redirect--so, uh, I might change the URL soon, okay?" In addition to implementing a 301 redirect, the Change of Address feature in Webmaster Tools can help Google find your new site.

      2) Your server is going to be moved and unavailable for a day. What should you do?

      Correct answer: c) Return "Network Unavailable (503)" with a helpful message to all requests

      Explanation: Maybe not as commonly known to webmasters, but very useful if your site is down! This tells crawlers to come back later, rather than crawling and indexing your "Down for maintenance" pages when you respond with 200 rather than 503. Check out the Help Center to learn more about HTTP status codes.

      3) Your website is not in the index five days after you've put it online; what should you do?

      Correct answer: b) Continue working on the site

      Explanation: This one is a bit tricky. There could be a number of reasons why your site is not indexed. For example, a site's robots.txt file may contain a directive to inadvertently block crawlers from searching its contents. But the main take-away from this question is that if your site is pretty new, it may just be a matter of time before it gets indexed. You should continue to focus on improving your site for your users.

      6) You need to remove 192 PDF files from the /private-files/ folder which have gotten indexed. What's the fastest way to do this?

      Correct answer: d) Disallow the folder in robots.txt and request removal of the whole folder in Webmaster Tools.

      Explanation: Before removing a directory that you don't want indexed, you need to include the Disallow directive in your robots.txt file to tell search bots not to crawl it anymore.

      9) You have a country-coded domain name called example.es. To associate your site with Spain, you need to:

      Correct answer: c) None of this is necessary. Google should already associate a domain ending in .es with Spain.

      Explanation: Some country-coded domains may overlap with international ones, like .tv--which could also be a site from Tuvalu. But these sort of cases are rare and if they do arise, don't be shy to seek out help on the forum.

      Great job to everyone who took the quiz and tested their know-how! And last but certainly not least, kudos to the top scorers! Congratulations on a quiz well done!

      40/40:
      • ChrisRaimondi
      • theopeek
      • beussery
      39/40:
      • Petro
      • pornel
      • Ian Macfarlane
      • g1smd
      • Mattman
      • thinkpragmatic
      • GLV
      • GoalGorilla
      • rssmarketer
      38/40:
      • BartVB
      • Kim Minh Kaplan
      • Ippi
      • Erik Dafforn
      • scole01
      • Konstantin
      • John
      • fer.vazquez
      • eMBe
      • Todd Nemet
      • p.jaroszynski
      • ph0b